By Any Way You Want It Weddings & Events

9.22.2014

Caress Voxbox is in!!

After returning from an awesome week at the beach, I came home to find that my first voxbox through Influenster had arrived!! I love freebies and this month's box included a sample from Caress' Fresh Collection.


The gardenia and white tea body wash smells incredible!! I already love Caress' other body washes since they're affordable and don't irritate my incredible sensitive skin, but this one seriously smells divine! 

My only complaint...I'm already out!!! I guess and trip to the store to pick up some more will be added to today's to do list. 


**I received this product complementary from Influenster for testing purposes.**

11.14.2011

Real Party: Santanafest '11 | North Carolina Party Planner

Santana's 1st Birthday
Rockstar Party
Santanafest '11

Ticket invitations designed and provided by Any Way You Want It Weddings & Events


Backstage Passes designed and  provided by Any Way You Want It Weddings & Events

Santana & Mommy all ready for the big rockstar party!


I had so much fun making this cake with Santana's mommy!

What a cutie pie!

11.02.2011

CRAFTY DAYS! Handprint Indian Corn

Today's craft is...

Handprint Indian Corn

This project is pretty simple. I freehanded the leaves but email me if you'd like me to send you a template. (anywayyouwantitevents@gmail.com)

You'll need:

1 sheet of light green piece of paper (I used cardstock but construction paper should work fine)
1 dark green piece of paper
1 yellow piece of paper
1 brown piece of paper
1 orange piece of paper
1 red piece of paper
1 white piece of paper
Hole puncher
Elmer's glue
Black marker
Brown marker
Red marker
Yellow marker
White marker (or gray if you can't find white)
Orange marker

1. Use dark green paper to create and cut out the corn leaves
2. Trace your child's hand on yellow paper and cut it out.
3. Glue the yellow hand behind the leaves
4. Use hole puncher to punch holes in brown, red, orange, and white paper. Be sure to empty your hole puncher before you start so you can collect the circles created with these colors.
5. Glue circles onto yellow hand.
6. Glue finished product onto light green paper
7. Use the markers to write this poem around the "corn". Use matching colored markers to write the capitalized words.

"The Colors of Indian Corn"
Mother Nature paints colors for you and me
on all the Indian Corn that we see.
BROWN is for the beauty, that welcome the fall,
RED is Mother Nature's love for us all,
YELLOW is the golden sun,
WHITE reminds us to be kind to everyone,
ORANGE tells us to be thankful each day,
for the variety of nature and it's wonderous ways.


I hope you enjoyed this craft! We'd love to see your version of this!

10.21.2011

CRAFTY DAYS! You've Been Boo-ed!

Today is not so much a craft but a fun activity for you and the kiddos before Halloween!

I remember in High School we woke up to a yard full of flamingos and a sign in the yard that said "You've Been Flocked!" It was hilarious and what a fun thing to wake up to. To this day we still don't know who "flocked" us.

This year there's a fun thing gooing around called "You've Been Boo-ed"

You put together a treat bag for your neighbors (or anyone else), attach the "You've Been Boo-ed" sign (see below) and drop it on their front porch. You want to do it in secret so they won't know it was you, then they'll pass it on to someone else.

Here's the one we put together.


You can print your own from the photo below or visit their website for different versions. (http://www.beenbooed.com/)


I hope you enjoyed this and I hope you "boo-ed" your neighbors and friends! Feel free to share your "been boo-ed" stories with us!


10.17.2011

CRAFTY DAYS!! Cotton Ball Ghost

Today's craft is...

Cotton Ball Ghost

You'll need:
1 white piece of paper (cardstock will work best, but construction paper would be ok)
Scissors
Elmer's Glue
Cotton Balls
2 Wobbly Eyes

1. Use template to cut out ghost.


2. Cover the ghost with the cotton balls. See below.
3. Glue on wobbly eyes


Did you enjoy this craft? We'd love to see your version of it!!

10.14.2011

CRAFTY DAYS! Indian Corn

Today's craft is...

Indian Corn

You'll need:
1 empty toilet paper roll
Non-toxic yellow paint
Beads (any color combination will work, we chose shades of brown, orange, and yellow)
1 small brown paper bag
About 1 ft. Yarn or raffia
Elmer's glue


1. Paint your empty toilet paper roll with the yellow paint.
2. Cut the bottom off of the paper bag, then cut a slit down the front
3. Crinkle the bag repeatedly. (Think about when you would make pilgrim vests in kindergarten, you'd wrinkle the paper until it felt like cloth)
4. Wrap the bag around the toilet paper roll leaving a portion of the roll exposed. See below.
5. Use yarn or raffia to secure.
6. Trim ends of the bag.
7. Glue beads onto toilet paper roll.


I hope you enjoyed this craft! If you did,we'd love to see pictures of your creation!

10.13.2011

Bloom & "Character" Bows!! | North Carolina Boutique

Check out our new bloom bows and "character" bows!! We'll have lots more coming soon!


All of these new bows will be available at our upcoming Holiday Gift Show, Nov. 12 at the Randolph Mall.


10.12.2011

Crafty Days! Handprint Bat

Today's craft is...

The Handprint Bat

You'll need:
1 sheet of paper, any color
Non-toxic black finger paint
Non-toxic white paint
2 "wobbly eyes"

1. Paint your child's right hand with the black finger paint. Press down on the right side of the page.
2. Paint your child's left hand with the black finger paint. Press down on the left side of the page. Be sure to leave enough space between the handprints to make a body.
3. Use the black paint to paint a large round circle between the hand prints. It should be large enough to connect the hand prints.


4. Use the black paint to make a smaller circle (the head) above the large circle.
5. Use the black paint to create two small triangles (the ears) on either side of the small circle.
6. Let project dry.
7. Add wobbly eyes.
8. Use white paint to create nose and mouth.


This project was super easy and my 2 year old loved getting the paint all over her hands and getting to put on his wobbly eyes! Did you enjoy this project? Share your pics, we'd love to see them!

10.10.2011

CRAFTY DAYS! Owl Photo Frame

Today's craft is...

Owl Photo Frame

You'll need:
1 sheet brown paper for body(I like cardstock, but construction paper would probably be fine)
1 sheet yellow paper for eyes, photo frame, beak, and feet
1 sheet orange paper for belly
1 sheet green paper for eyes
1 sheet patterned paper for wings(I tried to stay within the color scheme but any type would work)
Elmer's glue
2 wobbly eyes
1 photo of your little cutie pie

1. Use the template and brown paper to cut out the body of the owl.
2. Use template and orange paper to cut out owl belly. Glue into place on owl belly.

3. Cut out outside eye, beak, photo frame and feet out of yellow paper. See template below.
4. Cut out eye from white paper. See template below.
5. Cut out colored part of eye (iris) with green paper. See template below.

6. Glue photo frame on top of belly.
7. Glue wings on either side. See photo below.
8. Glue feet and beak into place. See photo below.
9. Glue outside eye (yellow), glue eye (white), glue iris (green) into place. See photo below.
10. Glue wobbly eyes on top of iris.
11. Trim photo to fit frame, glue into place.


Did you enjoy this craft? We'd love to see your version of this project!

10.07.2011

CRAFTY DAYS! Cute Candy Corn

Today's craft is...

Cute Candy Corn

This project was slightly more difficult but only because I freehanded it. I still think it is pretty simple and with the instructions below you should easily be able to create this adorable candy corn with your child.

You'll need:
1 sheet of orange paper (I like cardstock but construction paper would work just as well)
1 sheet of yellow paper
1 sheet of white paper
Elmer's glue
2 large wobbly eyes
1 black marker

1. Cut out a medium sized triangle out of the orange paper.
2. Round the edges.
3. Since I didn't use a template I simply laid the orange triangle over the yellow paper and traced around the area I wanted to use. You'll need to cut a 2 in. section of yellow paper to cover the bottom portion of the orange triangle. See below.
4. Do the same with the white piece of paper. You'll be creating the top of the triangle on the white paper. Trace around the orange triangle onto the white paper to create this piece. See below.
5. Glue the yellow and white pieces onto the orange triangle. See below.


6. Glue on the large wobbly eyes.
7. Draw a smile with the black marker.


This project only sounds complicated but I hope you were able to recreate it with your child.

Did you enjoy this craft? Share your pics!!

10.06.2011

CRAFTY DAYS! The Handprint Tree

Crafty Days are finally here!!!! They were supposed to start October 3rd but this week has completely gotten away from me!  They will start today and should post every Monday, Wednesday, & Friday through the end of the year. Some will be geared towards adults or older kids but most will be kid friendly for all ages!


Today's craft is...

Handprint Tree

For this craft you'll need:

1 sheet of paper (any color, we used blue)
Non-toxic brown finger paint
Non-toxic stamp pad (think fall colors like red, yellow, orange, but any color will work)

1. Paint your child's hand with the finger paint and press onto the middle of the paper.
2. You can either paint the trunk of the tree, like we've done, or paint your child's arm and press it onto the paper. See below.


3. Press your child's finger into the stamp pad then have your child press their finger down on the page around their handprint. Use as many colors as you would like and keep repeating until it looks like a tree full of leaves. See below.


This project was so simple and my 2 year old had a blast! I had to pry the stamp pad away from her!

Did you enjoy this craft? Share your pics with us!!

10.01.2011

image

Lace and fishnet stockings can be used to make amazing halloween decor! What a great and creative project! If you have any orphaned or partially ripped stockings laying around the house you might want to try this idea instead of just throwing them in the garbage!


image

9.28.2011

Jenna's 5th Birthday, it's a fairy party! | North Carolina Party Planner

Jenna's fairy party at the Center Of Performing Arts (COPA)  in Burlington, NC was a hit! All of the little fairies had a great time and loved getting to dress up with their wings and wands. We were so fortunate to provide a few tutus, a couple of suggestions, and a bit of time helping to set up this gorgeous party!!


The little fairies dining area


Fairy Minnie Mouse watched over all of the little fairies as they dined


This beautiful cake was provided by Carolina's Bake Shop in Burlington, NC.


The birthday girl's mom made all of these delicious treats!


All of the girls loved "Pin the Wand on the Fairy"


I had so much fun helping to coordinate this beautiful fairy party!!!

9.22.2011

REAL PARTY: Emma's Fairytale 2nd Birthday! | North Carolina Party Planner

This was the most fun party I've ever planned. The birthday girl was very clear that she loved Tinker Bell and Shrek, so I got to work trying to figure out how to combine the two. It all started with the invitation.

The "Shrek" font and the Tinker Bell watermark was the perfect way to pull the theme together.


Guests entered the party at the gates to The Swamp (the pool) and dropped their gifts before getting their character costumes. Check out the KEEP OUT OF THE SWAMP sign below.


Each child searched Emma's Enchanted Garden for the coins dropped by the Tooth Fairy the night before. I purchased the frames from the Dollar Store, spray painted them and added the flowers and coins to tie in the theme to the frame. The Tooth Fairy's coins were scattered under the hanging flowers. The kids used hula hoops to play Fairy Ring Toss with the pinwheel flowers.


They used their Tooth Fairy coins to "purchase" their costumes. Each girl received fairy wings and a tutu custom made for them by Any Way You Want It Weddings & Events.

 Each boy was given Shrek ears, for his very own Ogre costume. I found the ears on Amazon.com and they were adorable!

After finding their Tooth Fairy coins and putting on their costumes, they ventured over to Tinker's Nook.

At Tinker's Nook, the fairies and ogres got a chance to make their very own fairy dust. They had 12 different kinds of dust to choose from, including Giggledust, Dream Dust, Ogre Toe Jam, and Wing Washing Dust. They were each given their own pixie dust bottle and the girls even got a their very own fairy, more on those later.

When the fairytale creatures finished making their pixie dust, they took a tour of Lilypad Pond to find lost things (party favors). They were able to keep whatever they found and used the favor bags that were custom made for each child. See more on the favor bags below.

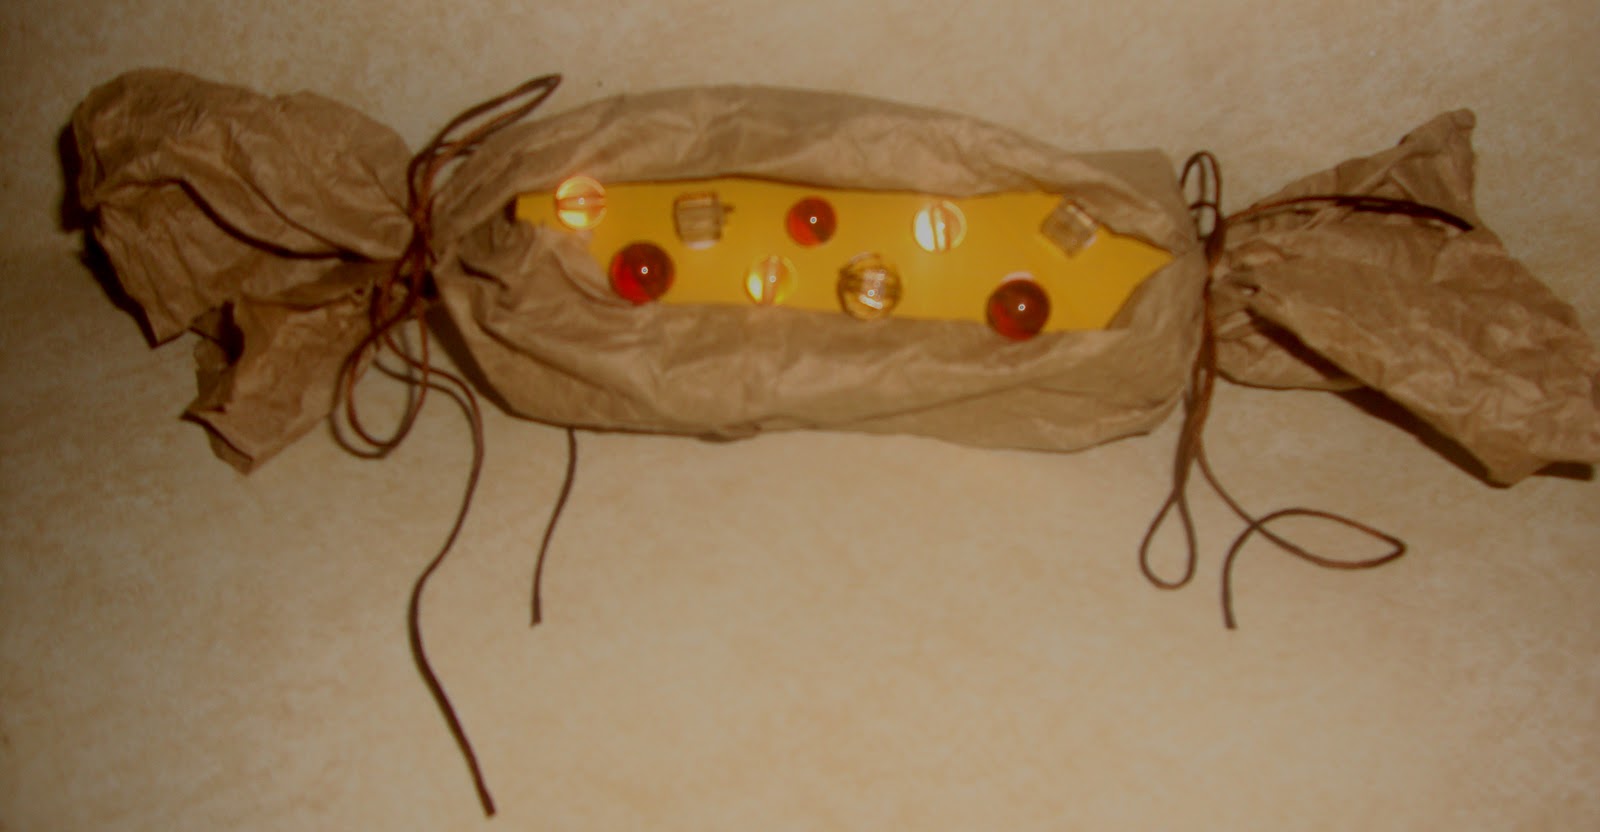
One of my favorites parts of the party was the fairytale themed food. I had a blast putting together the fairy fruit wands, the deep fried earwax, swamp pudding, and all of the other treats! Everything was so delicious and all of the fairytale creatures loved it all.

A wonderful friend of mine created the gorgeous cupcake tree and the logs to display all of the kabobs. He did such a great job!! The cupcakes were delicous and I found the Shrek and Tinker Bell themed ring toppers on Ebay. My aunt made the delicious chocolate pound cake for all of the adults.


Check out some of the great pictures of the adorable fairytale creatures from this adorable party.

Up first, the birthday girl, Emma Joy
Emma's costume was themed after Tinker Bell. Her "Team Tink" shirt was so adorable with her custom wings and tutu.


These pretty pink fairies were themed after garden fairy, Rosetta, from Disney's Tinker Bell. Check out the cute flower fairies that were given to each little girl. These were so simple to make but were such an adorable addition to the party.


These precious purple fairies were themed after fast flying fairy, Vidia, from Disney's Tinker Bell. Check out the pixie dust jars that each girl received. I found these adorable bottles at Hobby Lobby. I added stickers that matched each girl's fairy, created a name tag, and added some cute ribbon.


These beautiful blue fairies were themed after water fairy, Silvermist, from Disney's Tinker Bell. The favor bags given to each guest turned out much better than I expected. They were simply made from paper bags and I created labels for each kid. They were all packed full of lost things by the time the kids left.


These adorable yellow fairies were themed after light fairy, Iridessa, from Disney's Tinker Bell. The fairy wings were one of my favorite parts of this party. I loved them so much that I'm seriously considering adding them to our website soon.


These outstanding orange fairies were themed after animal fairy, Fawn, from Disney's Tinker Bell. All of these little fairies were so adorable!

What a beautiful group of fairytale creatures!!


I had such a great time planning this party and I can't wait to see what this little cutie wants to do for her next party!

All photos are property of Any Way You Want It Weddings & Events.